This is the second part of the blog detailing the auto-save feature that I've built for this site. In the first part, I showed a high-level overview of how the feature works. Now we'll dive into the code a little bit to show you how I built it. Here is a screen shot what you see when you create a new blog:
Edit Post Form
This is an HTML form, which is something that as an internet user you use almost everyday whether you realize it or not. It's a place where you can input information and then submit that information to a server on the internet. In this case, when a user clicks the 'Save Changes' button on this page, all the information contained in the form like the title, the post content, the tags, and whether or not the post is published is all gathered up and sent to the server.
However, in our 'use case', we want to auto-save the blog contents without relying on the user to click the save button. So the first thing I did was to create a post auto-saver 'module' in javascript, which is basically a little library of code that loads up on your browser when you are on this page. Here's how I set that up:
This says that once the page loads (the DOMContentLoaded event), the code looks for a form with an ID of 'new-post' or 'edit-post'. If it finds either of those forms, then it will call the loadPostAutoSaver() function. If you look at the HTML markup for the form above, you can see that the form has the 'edit-post' ID:
The loadPostAutoSaver function creates a javascript object. An object is an abstraction, which is basically a way to represent a real-world object using software. This object contains state (data) and methods (functions, or executable chunks of code). The function creates the object, and then attaches it to the window object, which allows it to be used by the browser.
const loadPostAutoSaver = function() {

  console.info("Loading Post Auto Saver Module");
  // Set up main object
  saver = {}
  ...
  window.utils.postAutoSaver = saver;
  saver.init();
}
lang-js
The next thing that I do is initialize the module, by calling the init function you see above. Here is what that function looks like:
As you can see, this function just calls three other functions. First, I setup event listeners, which are a thing in javascript that allow you to listen for certain 'events', and then trigger code to be run once those events are 'fired'. For example, in my case, I want to listen to when a user changes the content of the blog. That includes the title, the body, tags, and whether or not the blog is published.
// Listen for post title text input changes. Autosave on this event.
this.titleInput.addEventListener("change", function(event) {
  this.checkForUnsavedChanges('title', event.target.value);
}.bind(this))
lang-js
In this case, I've stored a reference to the 'titleInput' element, which is the field where the user inputs a title for the blog. The 'change' event fires when a user changes the content of the title. When that content changes, then we invoke (execute) the checkForUnsavedChanges function. We pass that function two arguments: the name of the element we are checking for changes to, and the value of the title after the change.
Here we use a javascript switch statement to run this block of code when the element we want to check is the title. The first thing we do is check if the current title value matches the 'original' title value. How do we know what the original title value is?
// Cache title
saver.titleInput = document.querySelector('input#post_title');

// Cache original state of title
saver.originalTitle = saver.titleInput.value;
lang-js
When the module first loads up, I store a reference to the title input element and then use that reference to extract the original title and store that as well.
If we find that the current title doesn't match the original title, we call the saveToLocalStorage function and pass it the element name as well as a new javascript object that contains the new title value.
saver.saveToLocalStorage = function(elementName, newStateObject) {
  console.info(`Post Auto Saver: Saving ${elementName} to local storage`);
  let savedStateObject = this.getSavedContent(this.blogId);
  // If we already have saved state, merge new changes and resave
  if (savedStateObject) {
    let mergedObject = {...savedStateObject, ...newStateObject};
    localStorage.setItem(this.blogId, JSON.stringify(mergedObject));
    this.hasUnsavedChanges = true;
  } // Else just save directly
  else {
    localStorage.setItem(this.blogId, JSON.stringify(newStateObject));
    this.hasUnsavedChanges = true;
  }
  console.info(`Post Auto Saver: ${elementName} successfully saved`);
}
lang-js
There is a lot going on here, but what's happening is pretty simple. The first thing we do is check whether or not we already have saved data by calling the getSavedContent function and passing it the blog ID, which is a way to know what data to look for. The getSavedContent function itself is pretty simple, it just uses the localStorage API to get the stored data.
If we find that we already have saved data for this blog post, we merge the existing data with the new data (in this case, the updated title) and then save it back to local storage. If there is no existing saved data, we just save the new title to local storage.
That takes care of storing 'unsaved' information, but how do we restore that information if the user's session is interrupted? In the init function, we called a function called checkForSavedPost. This function checks to see if there is saved data, and then if there is, it grabs the saved data in addition to the current data, and then sends both up to the server where I calculate the difference between the two.
saver.checkForSavedPost = function() {
  console.info('Post Auto Saver: Checking for saved post');
  ...
  // If we have saved content locally, check for diffs
  if (this.getSavedContent(this.blogId)) {
  ...
    let payload = window.utils.postAutoSaver.generateDiffPayload();
    fetch('/check_diffs', {
      method: 'POST',
  ...
      body: JSON.stringify(payload),
      credentials: 'same-origin'
    })
  ...
  }
}
lang-js
If we have saved content, we generate a 'payload' of the saved content and existing content and use the fetch API to make a HTTP request to the server to send that information up. On the server side, I use a gem called diffy to look at the difference between the two versions and return that information to the browser.
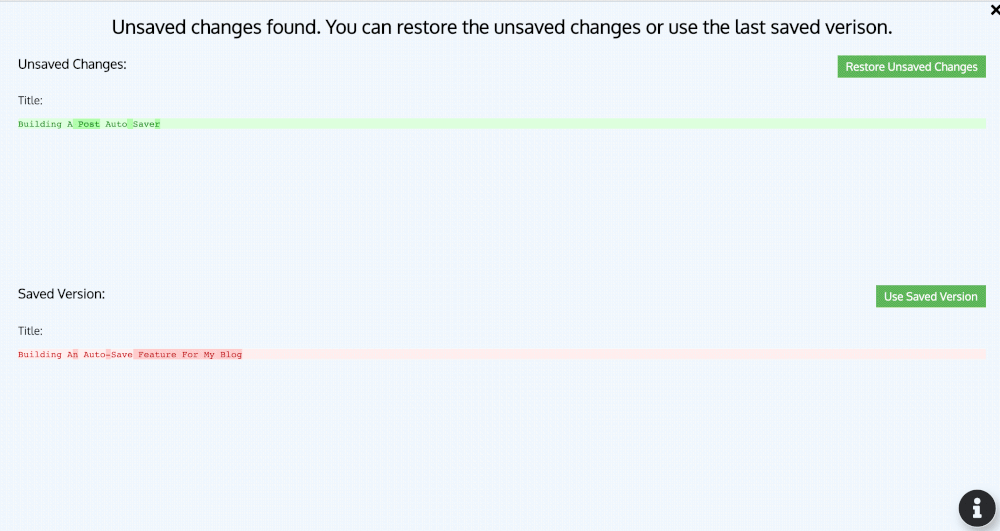
If there is a difference, we present that information to the user and allow them to choose which version they want to use. They have the option to restore their unsaved changes, and when they do, they are given a notification to remind them to save their changes:
restoreChanges.gif171 KB
If you'd like to take a look at the full source code for the auto-save feature, you can see it here.
Was this useful? Was it easy to follow along, or are you completely lost? Have you implemented a similar feature, and if so, how did you do it? I would love to get any feedback or hear about your experience - please feel free to leave a comment below.